
 When falls rolls around, it’s time to think about storing your lawn mower for the winter. It is recommended you follow the storage instructions in your equipment manual. Proper lawn mower storage and maintenance will keep your machine running safely and smoothly, and can prevent common malfunctions that arise from sitting unused for long periods of time.
Step 1: Prepare your mower to be worked on
Begin with your mower on a flat surface, turn off your engine (ensure that it’s cool before proceeding) and disconnect the spark plug ignition wire.
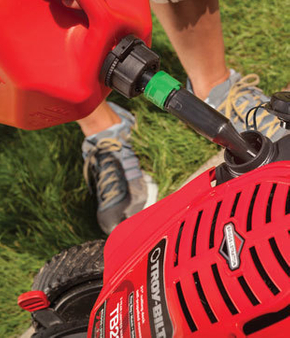
Step 2: Drain your fuel
Drain the remaining fuel from the tank or run your mower to get rid of excess fuel. Add fuel stabilizer to fresh fuel and fill the tank.
One of the number one reasons people have difficulty with their mower starting in the spring is because of stale gas that was left behind in the machine. After 30 days, old gas can become a thick molasses-like consistency that can gum up your machine regardless of how old or new it is. To prevent problems with your machine caused by stale gas, you can add a quality fuel stabilizer which can keep your gas fresh for up to 2 years. The fuel stabilizer with help to prevent old fuel from gumming-up the mower components when it is not in use and is an important element when it comes to storage.
Step 3: Replace the Spark Plug
If you notice the spark plug is worn or damaged, it is the perfect opportunity to replace it. Your spark plug’s operator’s manual will house the correct part number.
Step 4: Remove the battery
If your mower has a battery, remove it by following the procedure for your specific mower. Rider batteries should be stored somewhere cool and dry.
Step 5: Change the oil
Changing the oil will ensure your mower is in good condition during the winter months. To change the oil, you’ll want to do the following:
- Remove the dipstick. Then, place the tube of your siphon pump into the dipstick whole on the engine, and the bottom of the tube of the siphon into the oil pan.
- Pump the siphon handle three to four times to prime the pump. Once the oil begins to flow, it will flow without further pumping. You can now remove the siphon pump.
- Add new oil – refer to your operator’s manual to determine the correct type and amount of oil you’ll need for your mower model.
- Replace the dipstick. After several minutes, check the oil level and ensure the level of oil is within the range on the dipstick.
Step 6: Replace the air filter
- Release the thumb screw to remove the air filter cover, then remove the paper and foam elements of the air filter.
- Separate the foam element from the paper element.
- Apply a few drops of clean engine oil to the new foam element and squeeze out the excess oil. You can then install the new foam and paper elements.
Replace the air filter cover and secure it to the mower.
Step 7: Clean the undercarriage of the mower + inspect the blade
- To access the undercarriage and blade you’ll need to tilt the mower on it’s side with the air filter facing up. Thoroughly clean away dirt, grass clippings and other objects that may have become lodged in the undercarriage.
- Wear a pair of gloves and inspect your blade for wear or damage
- If the blade requires sharpening or needs to be replaced, they should be removed from the undercarriage. To do this, use a blade removal tool to hold the blade in place. Then, using a socket wrench, loosen the bolt securing the cutting blade to the engine driveshaft.
- Remove the blade ensuring to be cautious of the sharp edges
- Remove blade
- If your blade needs sharpening, a blade balancer sharpener kit will be needed. Follow the manufacturer’s instructions carefully when sharpening your mower to reduce the risk of accidental injury.
Step 8: Check for any broken or worn parts
Check all your parts such as the belt cover, discharge chute, bag, mulch plug and tires. Check cables for signs of rust, or corrosion and replace any that may be broken or worn as noted in your owner’s manual.
Step 9: Lubricate your mower
Prior to storing your mower, ensure you are lubricating all moving parts such as wheels and cables. Applying a coat of chassis grease to the blades will prevent rusting.
When all of these steps have been completed, your mower is ready for storage. Store your mower in a well-ventilated, clean, dry area. Be cognizant of what you store your mower near – avoid corrosive materials such as fertilizer, or appliances with a piolet light or flame like furnaces or water heaters.