Starting seeds indoors has several benefits: more varieties of plants to choose from, you know where your food is coming from, and you'll save money by purchasing seeds rather than grown plants. It also extends your gardening season by allowing plants and vegetables to grow for longer periods than your area's growing season typically permits, which will help diversify your harvest.
Tips & Tricks
Reap the benefits of indoor seeding with these tips that will help your garden get off its feet before spring officially arrives:
- Educate yourself on seeds. Read online or subscribe to seed catalogs to see what you'd like to grow and what's most appropriate to grow in your gardening zone. You can also research seed providers online to compare different offerings and prices. Depending on where you live, regional nurseries may carry varieties of seeds better suited to your environment.
- Don't start seeding too early. Most annual flowers and veggies should be sown indoors 6 weeks before the last frost in your area. Many plants sown too early will grow larger than expected and will need to be repotted throughout the winter, taking over your space and requiring unanticipated costs like larger containers. Another pitfall with seeding too early is having a fully grown, ready-to-go outdoor plant before the weather permits. More often than not, you won't be able to place mature plants out in the cold, as they aren't hardy enough to handle winter's harsh conditions.
- Know which seeds are appropriate to sow indoors. Not every vegetable should start indoors, as many can be planted directly into the ground and do not transplant well - like lettuce, spinach, beets, carrots and green beans. However, tomatoes, broccoli, eggplant, onions, cucumbers and peppers are all good plants to start indoors.
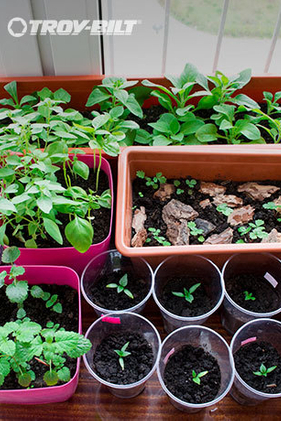
How to start seeding indoors
Make sure to have the right containers, soil mix, temperature and light when you start seeding indoors. Containers or trays should allow for drainage so new seedlings don't drown or sit in water for long periods of time. Look for a lightweight mix of soil made for seedlings (found at your local gardening store). Find a place in your home where there is natural light near a window and natural bottom heat - like on top of the refrigerator. You can also wrap the top of the container with plastic, so the humidity and temperature retain and help the seed bed thrive. Watering schedules will depend on the type of seed, so be sure to save the seed packet and follow the suggested water schedule.
As temperatures rise and the season changes, you'll need to move the plants outdoors carefully. Before transplanting them to a garden, they will need to be hardened off, which prepares them for unsheltered life outside. Gradually introduce your seeds outside by taking them out to a protected location for one hour then bring them back inside on the first day. Do this every day for a week, increasing by one hour, and by the end of the week you'll be up to seven hours outdoors - meaning the plant is ready to be transplanted. When you take them outside, keep them slightly sheltered; too much direct sunlight and winds can dry out the seedlings and damage them. After two weeks, they can be treated like other plants.